*THIS BLOG IS NO LONGER UPDATED*

My new website can be found at http://www.quernuscrafts.co.uk/

Klimt Millefiori Cat (b.29 December 2009)


As you know, I've been keen to try out more millefiori techniques, and on this occasion, I wanted to try out what Kato calls the Klimt cane technique, after the artist, Gustav Klimt, because of his trademark circles within squares. Although this looks like quite a complicated pattern, it is really quite straightforward. The cane works on the basis of what happens when you extrude clay using a clay gun with a square die.

I selected eight random colours, ranging from pinks and reds through to beige and brown, and then rolled them into logs, making them as close to the diameter of the barrel as possible. I then cut slices from each cane, approximately 3mm thick, and stacked those slices together in a new log. I kept the colours random, but tried to make sure I kept constrasting colours next to each other.

Once the composite log was complete, I rolled it lightly again to make sure it would fit snugly inside the clay gun. It took a bit of trial and error to get the right diameter, and I had to resize the log a couple of times. (As I found out, it's important to make sure the slices have adhered to each other before putting the log into the barrel, as it's sometimes necessary to pull it out again to get it to the right diameter.)
Once the log was in place, I used a square die and extruded all the clay. Because of the force used to extrude the clay through a small aperture, this resulted in concentric circles of different colour clay being framed in a square log. The outside of the log pretty much kept the same colour of the first disc of coloured clay (purple in this case), which I found to be quite amazing. I'm looking forward to experimenting with different shades of clay and different shapes of die to see what other effects I can come up with.

I cut the resultant very long, thin, square cane into 16 equal lengths, and stacked each length on top of each other in four rows of four, flipping some of them over so the pattern was different from adjacent lengths. Then I lightly rolled this square cane with a roller to adhere the blocks together, and cut thin slices to cover the core of scrap clay. Because the cane is quite large, it was easy to do large areas of the cat, but filling in the small gaps using single squares reshaped to fit was a bit more fiddly.

A light sanding down and a couple of coats of satin varnish finished him off, and now Klimt Millefiori Cat stands at 5.5cm tall, proudly showing off his fine multi-coloured coat!

Update: On New Year's Day, I made a Roly Poly Klimt Millefiori Cat to join his big brother using what was left of the cane. He measures 2.5cm all round and he wants to grow up to be 5.5cm tall too!


Hurty Paw Cat (b.28 December 2009)

This little kitten has definitely been in the wars! A commission from Jan, a good friend of mine, he is to be a present for a friend of hers who takes in all waifs and strays, particularly the ones who are on the poorly side. And so this wee kitten is going to be mewing at her door soon!


When Jan told me this story, I immediately pictured a kitten with a bandaged ear. I knew then that he was already made, and it was just a question of sitting down to bring him into being. Jan wanted a brown stripey cat, so I started off by mixing up a number of browns and beiges and blending them until I achieved a nice pattern.


I then rolled a very thin sheet of white clay out, and cut off a long, thin strip for the bandages. I wrapped this loosely round the kitten's right ear. I then had an idea to put one of the paws in a sling, which I did by  placing a small ball of white clay halfway up the body, and then winding a couple of strands of 'bandage' clay around the body.


(By introducing a third paw, this represents a bit of a departure from my usual 'two visible paws' policy. However, I think you'll agree that the kitten would have looked decidedly odd had he just had one paw on the ground.)

The look was finished by adding a small bandage to his tail, and he has a 'poor me' eyebrow above his visible eye - I just want to give him a hug!

Daisy Cat (b.25 December 2009)


On Christmas Day, there was snow outside, which had frozen hard, the sky was grey and leaden, with the promise of more to come. My mind drifted to all things sunlighty and summery, and this was the inspiration for Daisy Cat!

I have some lovely bright colours in Sculpey III and Fimo Soft (although I have recently put in an order for Sculpey Premo! as it comes highly recommended for millefiori work. More on that story later...)


I was drawn to the sunshine yellow, as I had a very clear idea in my mind that I wanted the cat's head to be the centre of the daisy. I made up a cat in the usual way, and cut out twelve small petal shapes from a sheet of clay rolled out on the thickest setting on the pasta machine (special thanks go to my sister for giving me a new Atlas machine for Christmas!).

I then thought carefully about the best way to attach the petals to the cat, and came up with the idea of putting a green collar round his neck, similar to the green stalk of the dasiy. Each petal was attached with a dab of liquid polymer clay, and I then added thin lines to each petal using a scalpel. There is so much scope here for using cane petals, so there is likely to be a range of Flower Cats in the not-too-distant future.

Wee Horses (b.21 December 2009)


Wee Horses go custom!

Steph Keegan from Methil in Fife (not too far from Pitlessie where I lived before moving down to Leeds 11 years ago!) contacted me through Folksy over the weekend and asked if I could make up Wee Horses in different colours. It turns out that she has four gorgeous horses, all with quite unusual markings. Well, you probably know by now that I'm always up for a challenge, so I relished the chance of trying out new techniques to achieve the right look. Steph sent through a number of pictures as source material, and I got to work!

The dun horse was probably the most straightforward, and it was just a question of mixing up the right colour of reddish brown for the body and head. The mane, hooves and fringe were all a deep brown/black.


Next I made the dun and white horse. This horse is really unusual - mainly white body with pale brown patches, pale mane and tail but with a startling black fringe and ears! I made up a white ball of clay for the body and then rolled out a thin sheet of ivory clay. From this I tore out random patterns to apply to the body, and then blended them in. The face was white clay too, with strips of ivory attached to either side to create a white blaze on the nose. And the dark fringe and ears speak for themselves!

Next I tried the spotted horse, which reminds me of a strawberry roan (I was horse-mad as a young girl, although my memory of all things equine is a little rusty now). To get the right spotted effect, I chopped up lots of white clay very finely, and then grated a few pieces of dark brown clay into it randomly. Once I was satisfied with the mix, I reformed the chopped clay into a sheet and rolled it out a few times. The brown specks were embedded throughout the clay, which gave it a mottled effect because it can be seen through the white clay. I rolled the sheet into a ball for the body, which smeared the brown even more, giving it a more natural look. I made the face using a similar technique, and added a few more tiny scraps of brown to the nose to complete the look. The mane was a mottled grey/brown/red so I roughly mixed up these colours and extruded them, which caused the strands to come out with a mottled effect.

The final horse was more straight forward, being black and white. I made this horse in much the same way as I made the dun and white horse, ie by having a white ball of clay and applying torn strips of black clay for the markings, and repeating the process with the face. The mane and tail were grey, and black hooves and ears complete the look.

I had so much fun making up these Wee Horses that I tried a bonus one using the Starry Night cane effect - I had wondered before if a dapple grey horse would work using this technique, and now I know that it does!

Starry Night Cats (b.19 December 2009)

I've been wanting to experiment more with canework of late, and I recently bought a copy of Donna Kato's The Art of Polymer Clay: Millefiori Techniques. I can't say I'm a great fan of her designs, and her self-promotion throughout the book can be a little OTT at times (she is the Donna Kato of Kato Polyclay) but there's no denying that her techniques are superb and I'm bursting with ideas!


Dracula Cat (b.19 December 2009)

Dracula Cat dreamed up at the suggestion of my friend, Jo, with whom he is now happily residing following formal adoption proceedings (aka exchange of Christmas gifts!)

I based the design of Dracula Cat on the Count from Sesame Street - he had the most distinctive look to go on, although the white streak in his hair courtesy of Bela Lugosi.

I started off by making a body core out of black clay. Because I wantd to keep his palor pale, I then cut the body in half and used flesh coloured clay for the torso and head. This also ensured that there was no 'VPL' from his trousers!

Once the two parts were joined, I then added a thin sheet of white clay for the white shirt, covered by a thin strip of red for the cummerband. I then wrapped a sheet of black clay round him for his cloak, rolling the top over to form a high collar. A couple of white wing collars and a cold medallion completed the look.

For the hair, I rolled out a thin sheet of black clay and cut out the basic shape using a circle cutter. Once I was happy with this, I added a very thin strip of white clay, and then added black ears and tiny fangs to his chops (now that was fiddly!) A pair of shiny black shoes and some gloss varnish helped make Dracula Cat look as smart as he does dangerous, even though he's only 4cm tall!

Biggles Cat (b.19 December 2009)

I've been looking forward to posting about Biggles Cat for ages, but I couldn't do it until after Christmas as he was a Christmas present for my good friend Jo!

Biggles Cat was so much fun to make! He stands about 4cm tall, so you can imagine that it got a bit fiddly at times! I started with the body of tan Sculpey III clay, and rolled out a very thin sheet of darker brown clay. From this I cut a small sheet for the jacket, and marked on the clay where this would go. Then I rolled out a very thin strip of white clay which I wrapped round his neck twice, to simulate a silk flying scarf.
(I tried hard to come up with a way of having the flying scarf streaming out behind him, but in the end, a clay scarf would have been too fragile, particularly for a length trip courtesy of Royal Mail.)

Before I put the ends of the scarf on Biggles Cat, I rolled out a thicker strip of paler clay for the fur trim, and then marked it with the lid of a felt tip pen (just the way I create the 'fur' on Santa Cats hats).


Next came the helmet. For this, I cut out two small circles from a sheet of chocolate clay and stacked them on top of each other. I have found that this is the most reliable way of creating a hat or helmet, as the double thickness allows for more realistic shaping.

Once I was satisfied with the shape, I then made up some dinky goggles using small discs of translucent clay tinted with brown clay, and encircled with thin strips of brown clay for the frames. A further thin strip of clay was added for the strap of the goggles, and two hemi-spheres of clay for the headphones (if that's the correct term!)  A couple of coats of satin varnish finished him off.

I have to say that Biggles Cat is one of my favourite creations so far - he has an adorable personality, and I know he'll be very happy in his new home!

Barrister Cat and Anaesthetist Cat Tree Decorations (b.15 December 2009)

I received another commission this week from another former colleague of mine, who had seen Springbok Cat and wanted to know if I could make up a couple of tree decorations for her grown children based on their occupations. And I was delighted to do so!

This is the third Barrister Cat I've made up, and each one has had a very different demeanour - I love the different characters which show up each time! I have to say that I had certain misgivings about putting a screw eye top pin into his barrister's wig, but in the end, by using a tiny silver hook with white organza ribbon, I don't think it looks to intrusive. It just goes to show that any of my designs can be adapted to a tree decoration, as long as I'm willing to impale the head with a hook!

The second request was for an Anaesthetist Cat tree decoration. This was a little more challenging, but I based him on Surgeon Cat (as yet only seen on Facebook - I consider him as a bit of a work-in-progress).  However, I decided to go with blue scrubs this time, which I made up by mixing turquoise with white to get the right shade. I also decided to make more of the surgical mask, and I think that adding the piping to the edges does make it more realistic (or as realistic as a cat in surgical scrubs can be!) Having two sets of ties coming from the mask also helps to make it more realistic, although I used the thinnest setting on the clay gun which meant tying the knots at the back was rather fiddly!

I completed the look by making up double thickness white paws - I think they look rather like a pair of clogs. I'm pleased to report that my colleague was suitably delighted with both characters!

I'm going to develop both these character cats over Christmas. For the Barrister Cat, I'm going to include a brief (pile of papers) tied up in pink ribbon, and there's so much scope for a whole range of specialty medical profession cats!

Psychedelic Millefiori Cats (b.13 December 2009)


Meet the Psychedelic Millefiori Cats! It's been a while since I did any canework (about 6 weeks), and I've been feeling the need to work on some new designs for a few weeks now. And I was presented with the perfect opportunity to do so when Debs, aka Prettygoods from Folksy (lovely shop - well worth a look!) bought one of the original Purple Millefiori Cats still listed on my Folksy shop.

Unfortunately, I had sold said Purple Millefiori Cat at a craft fair the week before, and hadn't updated my shop. Debs was very understanding about it all (it seems to be a bit of an occupational hazard for those of us doing craft fairs as well as running online shops), and it gave me a chance to make up some new millefiori cats. And it gave her a chance to have a say on the colours - lime green, bright pink and turquoise feature in her daughter's room, and I therefore obliged with these funky kittens!

I made up two separate canes using the pink and turquoise with reversed colours, and decided to keep green as the background. The two outer cats have been made up with a mixture of both canes, and I also used different sizes of the flowers to create a more random effect.

From the scraps left over from making the canes, I decided to experiment and made up a random cane wrapped in green. I'm rather pleased with the results, and these cats remind me of a chintz pattern. And that's got me thinking about using fabric patterns as inspiration for future designs - Laura Ashley, Liberty, etc. And one style I'm very keen to explore is retro patterns from the 1970s - there's something very appealing and nostalgic about those patterns (which was the main reason I fell in love with SwirlyArts' funky chicken!)

One other side effect of making these cats is my plan to make a Retro 1970s Afro Cat - I can visualise him very clearly, and I'll post a picture of him once he's come into existence!

Here's the full range of all the cats made from these canes - I still have lots of these flower canes left, so there will be more of these funky kittens in the future.


Springbok Cat (b.13 December 2009)

Meet Springbok Cat (or as I seem inclined to call him, Reebok Cat!) A commission from a rugby-mad former South African colleague of mine, this was a fairly straight forward design, apart from making up the shirt badges, which I have to confess were a bit fiddly.


Standing 4cm tall, this wee kitten has a burly look about him, mainly due to the thick gold and white collar. I made the body out of tan Sculpey III clay, and then rolled out a thin sheet of leaf green clay for the shirt. I did quite a bit of research on the strip itself, and I've ended up with a hybrid cross between the old style V neck shape, and the current springbok and shield badges. 

Doing this commission has got me thinking about some sporting cats - they lend themselves very well to football and rugby shirts, so if anyone out there has any special requests for favourite team colours, do get in touch!

Ilkley Christmas Arts Market (12 December 2009)

I had a great day in Ilkley on Saturday! It was the Ilkley Christmas Arts Market run by Jo Whitehead, aka Glassprimitif, and as before, it was a very well run affair. The Riddings Hall is a lovely venue - plenty of natural light, small enough that you don't feel lost in it, but large enough to allow for a good number of stalls (I believe there were 20 or so there on Saturday).


Trufood Catering were there again, with their lovely homemade scones and keep-it-local, keep-it-real ethos which fits so well with the market itself. My other half, Greg, was there as always to help carry boxes, and keep me in cups of tea through the day!

Here's me with my wee creatures all laid just before the doors opened. (I had to abandon the banner half way through the day because it kept coming unstuck and falling off - might need to resort to velcro soon...)


There were some fabulous people there, and once again, Swirlyarts had a stall. Swirlyarts is Lynsey Serle, and is the powerhouse behind the Cuteable website, the best resource on the 'net for all things cute! Definitely worth checking out her shop on Folksy. And I am hugely indebted to Lynsey for furnishing me with a fantastic square of fake grass she picked up from her local scrap store. She saw it at the beginning of December and immediately thought of me! I am so chuffed, as it is a perfect addition to my display, and the perfect habitat for my Wee Horses. (Another big thank you to Lynsey for commission the Star Wars Cats - I think she liked them :)


Later on in the day, I moved the flock of Wee Sheep into the paddock, after the Wee Horses were all sold!

I bought some fantastic Richard Scarry gift tags from Lynsey on Saturday - my sister and I grew up with Richard Scarry and loved the stories of Lowly Worm, Huckle Cat et al, and I know my sister will just love these on her Christmas presents!

(By way of correcting an earlier omission, here is the fantastic funky retro chicken I bought from Lynsey at the last Ilkley Arts Market in October. We actually arranged a trade - some Rainbow Cats for a Chicken. Fair swap.  I love this chicken! I'm sure we had curtains made out of this fabric in the 70s... And he's now filled with quinoa, so I'm very glad I've finally found a use for it!)

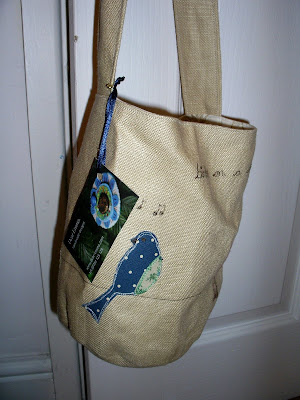
Saturday was the day for Christmas shopping for me, and I was spoilt for choice! To my left was Cathy Emmott, aka Dear Emma. I bought this fantastic bannister bag embroidered with sweet little birds on a wire - you can see it in the top picture (second bag from the front).


On the stall across from me was Sarah Westwood. I first came across Sarah's work at the British Craft Trade Fair in Harrogate in April this year - I thought her work was unique and fun then, so it was a real privilege to be able to admire her work for the whole day!  I bought two of her cute wax tiles for my nieces, both with sweet little bird designs.


The tiles are about 6cm square and have a mount plate on the back to hang on the wall. Sarah was featured in Cuteable on 14 December - click here for more information.

There were many other great artists, designers and makers at the market, including Jane Carlisle's beautiful silk collage art under the name of AJC Designs, and Gus Wright's fluid and organic ceramic work. And a special mention goes to Carol Coleman, a Textile Artist who runs Fibredance and who had the stall to my left. Her work is beautifully three-dimensional and tactile.

As for me, this was my most successful fair of the season, and I sold about about 50 pieces, including some of my commission pieces. And I know I've said this before, but one of the great joys for me is meeting so many amazing people, both fellow crafters and the people who come to the fairs who clearly have an appreciation for art and creativity. It energises me, and I am thankful every day that I had the courage to make the break and leave the legal profession. I now feel alive for the first time, and although there are ups and downs, I wouldn't swap any of it for the world (not even for a funky chicken!)

Star Wars Cats (b.8 December 2009)

What is thy bidding, my master?...A huge thank you to Lynsey of Swirlyarts and Cuteable fame, who commissioned these three character cats a few weeks ago - I stayed up until 3am this morning to finish them off, I was enjoying myself so much!


When Lynsey first asked if I could do three characters from Star Wars, I leapt at the chance. After all, not long before, I had made some AC/DC Cats, so I felt sure I could find enough obvious features to make them recognisable as both cats and Star Wars characters. And that really is the key to making this type of commission, and that's the reason why Han Solo didn't quite make the grade - it's a little hard to put a leather waistcoat on a cat with no arms :)

Luke Skywalker made the first appearance. I used flesh pink Sculpey III clay for the body, and then cut a thin sheet of white clay for his wrap-around jacket. I also wrapped a thin sheet of beige clay for his trousers, and gave him a pair of hard-wearing sandboots. Whenever I think of Luke Skywalker (and I did quite a lot when I was much, much younger), I see him in this outfit, with his ridiculous utility belt and floppy blond hair. And so that's what I gave this wee cat! He has both his light saber and his binoculars, and extruded yellow clay for his hair.

Next came Princess Leia. I'd been looking forward to making her because of the iconic side buns she wore in the first (fourth?) film. Again I used the flesh Sculpey clay and carefully wrapped a thin sheet of white clay around the body to reflect her rather chaste dress. Because her neck line is pretty high, I made up smaller than usual chops which I placed over the top of the dress. Internet research revealed that Leia's belt was silver and not black (as I had first thought), and although I've never consciously been aware of what she wore on her feet, I have given her some dainty white shoes. The hair was the fun part! I made up some thick extruded clay and coiled it round into the buns. Then I extruded some much thinner clay and created the very severe centre parting she wore in the film. I was in two minds about putting cat ears on, as my thinking all along is that they would have been obscured by the buns, but when I tried them out, they worked much better than I had expected. Et voila!

Last, but certainly not least, came Darth Vader Cat. I had in fact tried Darth Vader Cat Mk I last week, but something wasn't quite right. I had included white chops above the triangular mouthpiece and had given him a fluffy pink light saber, but it all somehow made him look more cute than menacing. (Now that I see them side by side, the one on the right looks more like a policeman! I will leave the choice up to Lynsey as to which one she prefers, but my vote's for the cat on the left!)

So I started over and left out the chops, focusing instead on getting helmet and eye surrounds to the proper shape. I used 4mm black onyx beads for the eyes this time to reflect the large bulbous eyes in Darth Vader's helmet. Two short logs of silver next to the mouth piece completed the look, and I finished him off with two coats of gloss varnish to give him an uber shiny finish.

For the rest of the week, I'll be making up Christmas stock for the Ilkley Arts Market on Saturday, but I'm itching to have a go at Yoda Cat! Watch this space....

Lion and Tiger (b.7 December 2009)


Grrrrrrr....Thanks to Donna who commissioned these Wild Beasties from me at the Bruntcliffe School Christmas Fayre on 22 November! It was a lot of fun departing from my usual cat style, and I'm very pleased with the way these have turned out. They will definitely be joining the Wild Beasties range in the near future!

The Tiger came first - to begin with, I mixed up orange, black and a small bit of white, and then lightly mixed the colours to create a defined stripey effect. The features were pretty straightforward - the rounded ears with white inner fluff, the slightly larger chops and nose, all finished off with a large, rounded tail. He stands about 4cm tall. Since making him, I've tried out a few more colour mixes but haven't been happy with the results. I suspect I'll need to be satisfied with the more stylised interpretation of a tiger, rather than realism (that would be in keeping with what has gone before...Rainbow Cats, anyone?!)

Slightly more challenging was the Lion. I started by mixing up a golden yellow colour for the body (bright yellow mixed with ivory, a touch of sweet potato and some white). The features were also quite straightforward and were similar to the Tiger's. The part which did cause me some pause for thought was the mane.

I had all sorts of ideas to begin with, and was initially going to dry felt some wool into a mane shape and then attach it with liquid polymer clay. Then, when I was in town the other day, I went to Samuel Taylor's (fantastic haberdashery shop) and found some brown feather trim which I thought could work very well. Alas, when the time came to apply it, the fluff was so thick that it virtually obscured the entirety of the Lion. Trimming it down helped to a certain extent, but my experience with trimmed feather trim was much the same as it was with trimming the black pom-pom for Bearskin Cat. It went EVERYWHERE. In the end, I went with extruded clay and then built up the mane strand by pain-staking strand. And I think the finished effect works pretty well, although I'll work more on getting a layer of clay under the strands to speed up the 'maning' process!

.

Sasquatch Cat (b.5 December 2009)


There has always been fierce debate about the existence of Sasquatch Cat. A cousin to the North AmericanYeti, Sasquatch Cat was rumoured to inhabit the remoter parts of the Yorkshire Dales, but until recently, the only evidence that he existed was in the form of this blurry photograph taken by a hiker who was surprised when eating his lunch one afternoon during a walk up Pen-y-Ghent.


But now Sasquatch Cat has come down from the hills and has allowed himself to be photographed properly for the first time. Contrary to rumours, Sasquatch Cat is in fact only 6cm tall and 3cm wide, so it is perhaps unsurprising that he has proved so elusive up until now.

Despite his fearsome appearance, Sasquatch Cat is remarkably gentle, and his sharp claws are only used to climb trees and bushes to escape from the prying eyes of ramblers. His long coat is a mixture of grey and white strands, and it is so unkempt that it keeps getting in his eyes. He has a luxurious tail which he wraps round himself at night when sleeping.

Sasquatch Cat's unexpected appearance can perhaps be explained by the request from Mickey of The Green Apple online shop for a cat which looks like a friend of hers.


Three Wee Sheep (b.5 December 2009)


When I was at the Bruntcliffe School Christmas Fayre on 22 November 2009, I received a commission for a family of three grey sheep. And here they are!

Measuring from left to right 3cm, 2.5cm and 2cm wide, this family have dark grey faces, and mottled grey wool. I made up the wool by mixing together a couple of shades of grey and some white, and then extruded the mix into strands.


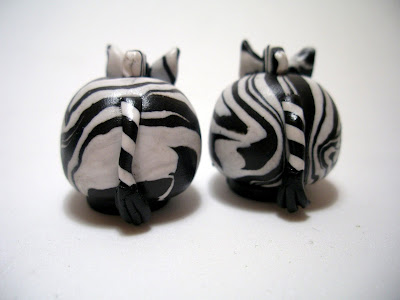
Wee Zebras (b.5 December 2009)


After a hectic week filled with preparations for an exclusive Christmas Shopping Evening which I organised for Artsmix, it was a relief to get back to the crafting table to try my hand at some new designs.


I had a monochrome day on Saturday - I only worked with black and white, as I was making up a couple of commissions (more to follow shortly on those). And as I mashed up the left over black and white clay, I was struck by the possibility of making Wee Zebras. Based on the Wee Horse shape, after doing some internet research, I made the nose black, the mane short and stripey (like a mohican), and the tail was thin and stripey with a black tuft at the end.

The trick with these was not to mix the black and white too much so that the stripes could be preserved as intact as possible. For the mane, I extruded black and white strands and then made up a double thicknes of alternating strands, trimming them very short before fixing them to the body with liquid polymer clay. I teased out the strands a little bit to make it look more natural. The tail was made by rolling out two thin logs of black and white and then twisting them together, like a candy cane. I then stuck a few short strands of black extruded clay to make the tuft at the end. A thin circle of black clay for the hooves completed the look, and a coat of satin varnish gives their coats a glossy finish.

I'll be making more Wild Beasties soon - I have a commission for a Lion and a Tiger, and I want to try my hand at an Elephant and a Giraffe as well. A Hippo could work too, and if you've got any more suggestions, do get in touch!