
.JPG)
12th October 2014
I did a fair bit of online research to find the best technique for making the carved hollow pumpkins. It has taken a lot of trial and error, but in the end, I have come up with my own technique that incorporates some elements from a number of online tutorials (see links at the end). And to save others going through what I went through, I thought I would put together a tutorial on what has worked best for me.
Please note this is a tutorial for the pumpkins ONLY, not the creatures that perch inside. Those are my own design so please don't copy them - fair's fair, after all.
Safety Note:
There are two methods available, but I've found the one with the polystyrene balls works best. The polystyrene balls only shrink, rather than melt, when baked at 110 C. To my knowledge, no toxic fumes are given off during the baking process, but if you have any concerns, use the second method with the tin foil and rice.
Tools and materials
Orange clay (Fimo Professional is best)
Green clay (for pumpkin stalk)
Pasta machine (or two knitting needles and a roller)
Scissors
Scalpel
Small round cutter
Tweezers/pliers
Knitting needle (or similar)
Ball shaper tool
Polystyrene (Styrofoam) balls (available from any craft supply shop)
Oven
Step 1 - Forming the pumpkin shape
Condition about 25g of orange Fimo Professional clay. (Although Sculpey III Sweet Potato is the best colour for pumpkins, I've found that Fimo is stronger for carving the face.) Roll out a flat sheet about 3mm thick. I have used the thickest setting on a pasta machine for this, but you can achieve the same result by using two knitting needles and a roller.
To create the pumpkin shape, I have found that polystyrene balls are best. These are available in a range of sizes, and I use either 25mm or 30mm diameter ones. For larger sizes, you'll need more clay to cover the ball.
Place the ball in the centre of the flat sheet, and fold the sheet around it, pinching up four corners so that the clay encases the ball as neatly as possible.
Try to make sure there is no air trapped during this process. Once all four corners are sealed as closely as possible round the ball, snip off the excess clay using a pair of scissors.
It is possible to use a scalpel for this, but I've found scissors are easier (and safer!) to use. Follow the contour of the ball and try not to cut too deeply so there is enough clay at the seams to cover the ball evenly. Blend the seams together from bottom to top, pushing any air pockets to the top of the ball. Any air trapped under the clay will feel spongy and will distort the shape - you can release the air by using a scalpel or needle, and then pushing the clay together again so that it covers the ball as evenly and closely as possible.
After removing all excess clay and making sure there are no air pockets, roll the ball vigorously between the palms of your hand to smooth it off. Then press the top of the ball lightly with the palm of your hand to flatten the bottom and give it a flat surface to stand on.
Step 2 - Marking the pumpkin
Remove the pumpkin lid using either a small round cutter or a scalpel. This allows the ball to be exposed to the heat so that it shrinks enough during baking to allow you to remove it without too much difficulty.
Position a small round metal cutter at the top of the pumpkin and press down through the full thickness of the clay. This will also help flatten the bottom a bit more. Remove the excess clay using a scalpel. If you're lucky, the circle of cut clay will lift out in one piece, but in my experience it's more common to remove it piecemeal as the clay does stick to the ball. You can neaten the edges around the rim if required after baking using a scalpel.
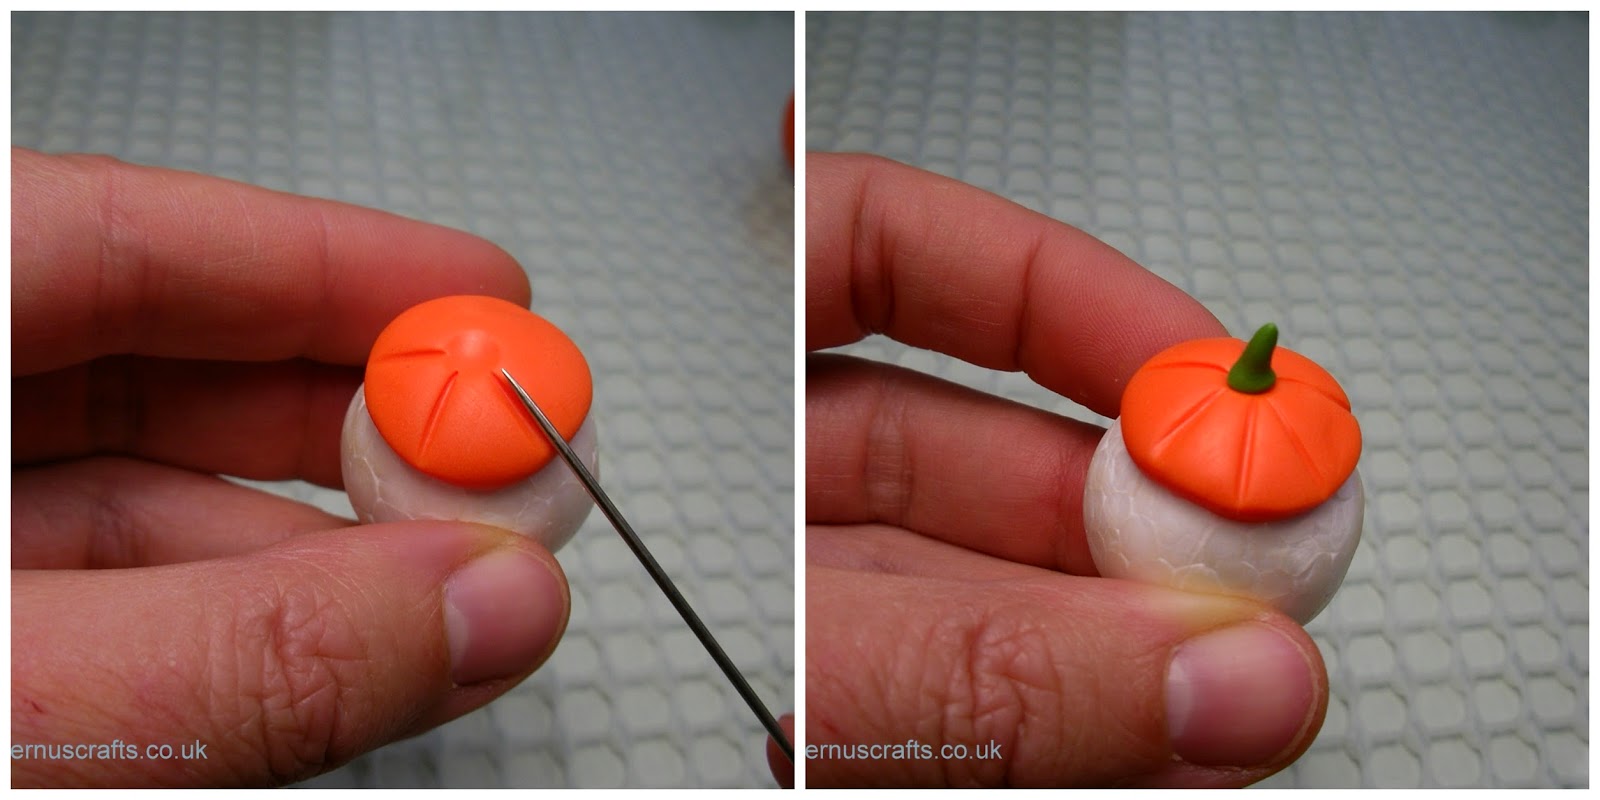
Add the pumpkin lines first of all using a needle. Hold the pumpkin in one hand, place the needle at the top and roll it down to create a line from top to bottom. Add five or six lines at irregular intervals around the pumpkin.
Follow a simple template to create the eyes, nose and mouth. Using a scalpel, carefully cut the features through the full thickness of the clay so that they are easy to remove after baking. The neater you are at this stage, the better the finish will be after baking.
Bake the pumpkin following manufacturer's instructions. Although Fimo Professional should be baked at 110 C, I've found going up to 120 C doesn't scorch the clay, and it helps to shrink the polystyrene foam that much more. However, as always, use your own judgment and follow the manufacturer's instructions in you have any doubt.
Step 3 - Creating the lid
There are a few ways to create the lid. If it doesn't need to be an exact fit (like the one shown in the main picture at the top), cut out a circle of clay using the same cutter used to remove the lid from the pumpkin. Place this over a polystyrene ball of the same size used for the pumpkin to create the curve, and then add the lines in the same way as you did for the pumpkin.
Shape a small piece of green clay for the stalk, and press it firmly to the lid (I've created a small depression using a ball shaper tool). Bake separately according to manufacturer's instructions.
If you need the lid to fit exactly, wait until the pumpkin has baked and then place a sheet of clay over the opening to get an imprint. Cut out the exact shape with a scalpel, and shape it using a polystyrene ball as before.
Step 4 - Finishing the pumpkin
Once the pumpkin has fully cooled, you will see the polystyrene ball has shrunk so that it looks like a small lumpy snowball. The rate of shrinkage can vary.
Put your finger on the ball and push it to one side to unstick it from the bottom of the pumpkin. If the ball isn't small enough to drop out of the top, use the tweezers to pick off little bits until it is.
Once the ball has been removed, use a scalpel to carefully pick out the pumpkin face. The idea is to follow the pre-cut lines as much as possible, easing the scalpel in gently to loosen the parts to be removed. It's a good idea not to rush this stage, and also try not to apply too much pressure as you go, as this can sometimes cause cracks which can't be repaired (this is when I found out that Fimo is much stronger than Sculpey III!) Neaten the inner edges with the scalpel if necessary.

Et voila!
Alternative method
Use a square of tin foil about 5" square, and fill it with approximately 5g of uncooked rice (the amount of rice will vary depending on the size of the pumpkin required). Twist the foil and rice into a ball tighten the foil as much as possible, leaving a 'tuft' of foil at the top. Wind masking tape around the outside of the ball.
Wrap the sheet of clay around the tin foil ball as before, using a scalpel to cut the top of the pumpkin around the tuft of foil. Add the markings and bake as before.
Once the clay has cooled, cut out the face markings as before, and then ease open the foil at the top and shake out the rice. The foil can then be picked out using tweezers.
I discovered this particular technique from a YouTube tutorial, which you can watch here. Another technique is to use a ball of tin foil for the core, but it does take some work to pick it out fully after baking.
Other pumpkin tutorials:
https://www.youtube.com/watch?v=vcUa78QWDaI
https://www.youtube.com/watch?v=HdDCB7YR70Y
https://www.youtube.com/watch?v=SObwe3gHrMs
I hope you've found this tutorial helpful - you can see all the Halloween creatures I've made, including creatures in different pumpkin colours, on my Flickr page here.
And in other VERY exciting news, I'm working with the talented Jennifer of JS Miniatures to come up with a way of putting a tiny light in these pumpkins - watch this space :)
Have fun!

.JPG)
Please note this is a tutorial for the pumpkins ONLY, not the creatures that perch inside. Those are my own design so please don't copy them - fair's fair, after all.
Safety Note:
There are two methods available, but I've found the one with the polystyrene balls works best. The polystyrene balls only shrink, rather than melt, when baked at 110 C. To my knowledge, no toxic fumes are given off during the baking process, but if you have any concerns, use the second method with the tin foil and rice.
Tools and materials
.JPG) |
| Materials and tools |
Green clay (for pumpkin stalk)
Pasta machine (or two knitting needles and a roller)
Scissors
Scalpel
Small round cutter
Tweezers/pliers
Knitting needle (or similar)
Ball shaper tool
Polystyrene (Styrofoam) balls (available from any craft supply shop)
Oven
Step 1 - Forming the pumpkin shape
Condition about 25g of orange Fimo Professional clay. (Although Sculpey III Sweet Potato is the best colour for pumpkins, I've found that Fimo is stronger for carving the face.) Roll out a flat sheet about 3mm thick. I have used the thickest setting on a pasta machine for this, but you can achieve the same result by using two knitting needles and a roller.
 |
| Rolling out the clay using knitting needles as thickness guides |
To create the pumpkin shape, I have found that polystyrene balls are best. These are available in a range of sizes, and I use either 25mm or 30mm diameter ones. For larger sizes, you'll need more clay to cover the ball.
Place the ball in the centre of the flat sheet, and fold the sheet around it, pinching up four corners so that the clay encases the ball as neatly as possible.
 |
| Wrapping the clay around the polystyrene ball |
Try to make sure there is no air trapped during this process. Once all four corners are sealed as closely as possible round the ball, snip off the excess clay using a pair of scissors.
 |
| Snipping off the excess clay |
After removing all excess clay and making sure there are no air pockets, roll the ball vigorously between the palms of your hand to smooth it off. Then press the top of the ball lightly with the palm of your hand to flatten the bottom and give it a flat surface to stand on.
 |
| The finished clay-covered polystyrene ball |
Remove the pumpkin lid using either a small round cutter or a scalpel. This allows the ball to be exposed to the heat so that it shrinks enough during baking to allow you to remove it without too much difficulty.
 |
| Removing the pumpkin lid |
 |
| Adding the pumpkin lines |
Follow a simple template to create the eyes, nose and mouth. Using a scalpel, carefully cut the features through the full thickness of the clay so that they are easy to remove after baking. The neater you are at this stage, the better the finish will be after baking.
 |
| Carving the face |
There are a few ways to create the lid. If it doesn't need to be an exact fit (like the one shown in the main picture at the top), cut out a circle of clay using the same cutter used to remove the lid from the pumpkin. Place this over a polystyrene ball of the same size used for the pumpkin to create the curve, and then add the lines in the same way as you did for the pumpkin.
 |
| Creating the lid |
If you need the lid to fit exactly, wait until the pumpkin has baked and then place a sheet of clay over the opening to get an imprint. Cut out the exact shape with a scalpel, and shape it using a polystyrene ball as before.
Step 4 - Finishing the pumpkin
Once the pumpkin has fully cooled, you will see the polystyrene ball has shrunk so that it looks like a small lumpy snowball. The rate of shrinkage can vary.
 |
| The balls can shrink at different rates |
 |
| Removing the ball using tweezers |
Once the ball has been removed, use a scalpel to carefully pick out the pumpkin face. The idea is to follow the pre-cut lines as much as possible, easing the scalpel in gently to loosen the parts to be removed. It's a good idea not to rush this stage, and also try not to apply too much pressure as you go, as this can sometimes cause cracks which can't be repaired (this is when I found out that Fimo is much stronger than Sculpey III!) Neaten the inner edges with the scalpel if necessary.
Et voila!
Alternative method
Use a square of tin foil about 5" square, and fill it with approximately 5g of uncooked rice (the amount of rice will vary depending on the size of the pumpkin required). Twist the foil and rice into a ball tighten the foil as much as possible, leaving a 'tuft' of foil at the top. Wind masking tape around the outside of the ball.
 |
| Rice and tin foil method |
Once the clay has cooled, cut out the face markings as before, and then ease open the foil at the top and shake out the rice. The foil can then be picked out using tweezers.
I discovered this particular technique from a YouTube tutorial, which you can watch here. Another technique is to use a ball of tin foil for the core, but it does take some work to pick it out fully after baking.
Other pumpkin tutorials:
https://www.youtube.com/watch?v=vcUa78QWDaI
https://www.youtube.com/watch?v=HdDCB7YR70Y
https://www.youtube.com/watch?v=SObwe3gHrMs
I hope you've found this tutorial helpful - you can see all the Halloween creatures I've made, including creatures in different pumpkin colours, on my Flickr page here.
And in other VERY exciting news, I'm working with the talented Jennifer of JS Miniatures to come up with a way of putting a tiny light in these pumpkins - watch this space :)
Have fun!
Might have to find the patience to give this a go, give Ollie and friends a little pumpkin :D
ReplyDeleteI have been using marbles to shape the clay for teapots but it is really hard to get the marble out without deforming the clay. I am looking forward to giving these techniques a go. Thank you!
ReplyDeleteI would love to have a 'go' at this. I so love your little darling animals in the pumpkins....and I'd own them all, or even just one if I could, but funds are really tight right now and our dollar isn't in the best of health against the
ReplyDeleteUSA or UK dollar.........thank you for so generously sharing this, and I trust no one copies your little guys.......and that would not be right at all.......
greeat, i love it, so cute
DeleteExcellent Tutorial !! I will find this quite useful not just for making hollowed out pumpkins but for any time I need to hollow out a clay ball. Thanks for taking the extra time to share and create a tutorial for this !! ;)
ReplyDelete